🚀 Quick Start Guide
Equipment 🎙
The advantages of SoloApp become apparent when using high quality equipment. If you have an external stereo microphone, as well as external speakers or headphones, connect them to your computer before starting the app.
Stability and speed of the internet connection is also very important. Although SoloApp has demonstrated excellent results using WiFi, using an ethernet cable to connect your computer directly to your internet modem or router is advisable for more consistent results.
Installation 💾
Download the appropriate installation file from here.
Windows
Double-click on the downloaded file to automatically install the app.
MacOS
Double-click on the downloaded file and Install the app by dragging the app icon into the Applications folder:

You should now be able to start the app from your Applications folder on Mac (in Finder, click on menu “Go” and choose “Applications”), or find it through the Launchpad on the Dock bar. On Windows you will find the shortcut icon on your Desktop.
Signing Up 👨🏿💻👨🏻💻👩🏼💻
After starting the app for the first time, you need to click "Log In":

If you haven’t registered previously, click “Sign Up” on the right panel of the next window:

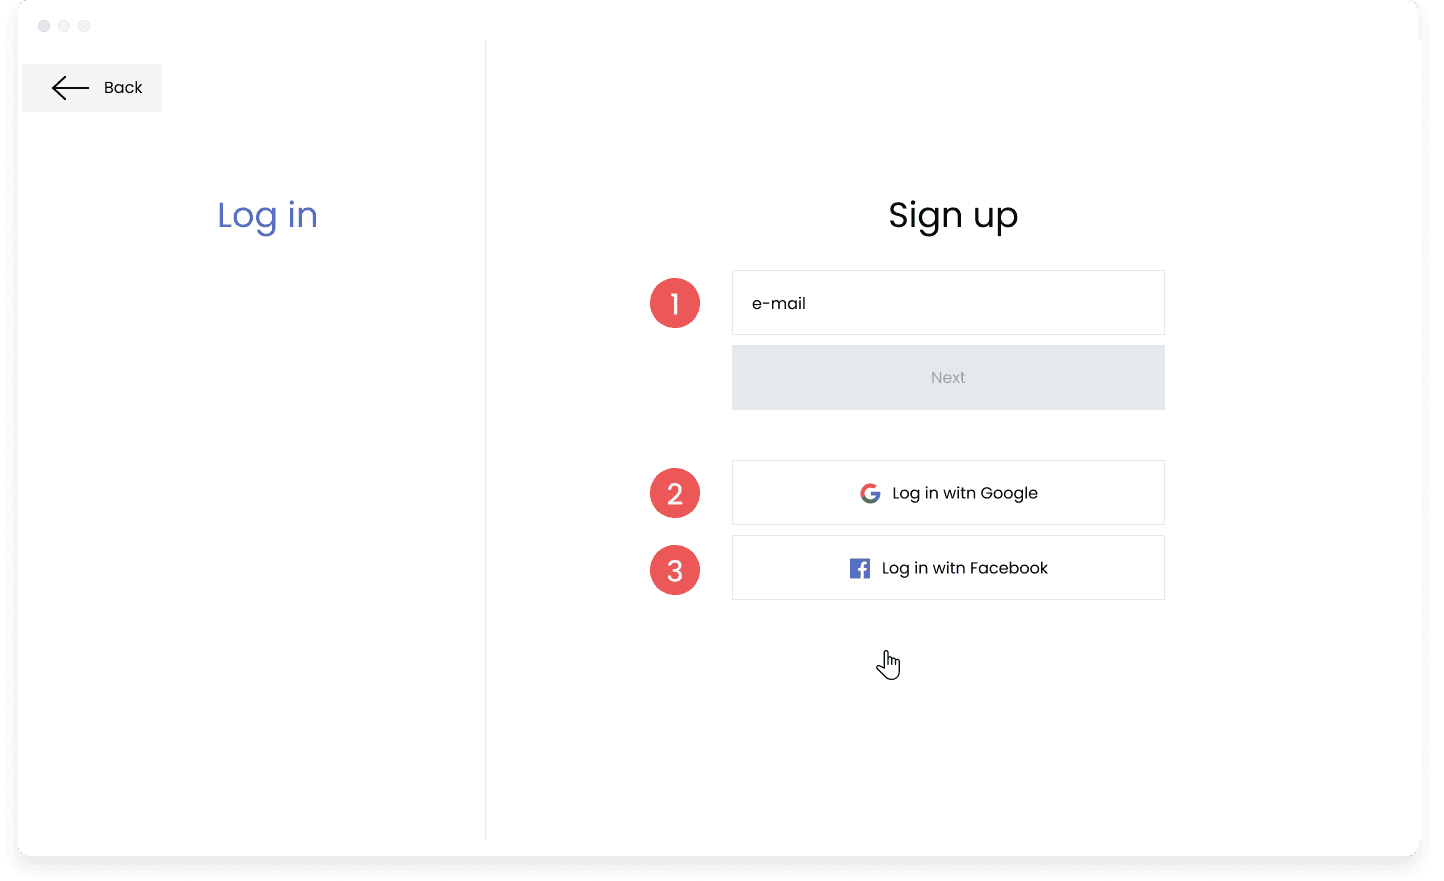
Then either enter your email (1), click “Next”, and finish the sign-up process on the following page, or simply log in with your Google account (2) or your Facebook account (3):

If you choose options 2 or 3, you’ll be taken to Google or Facebook login pages in your default browser. Once you log in there, you’ll see a prompt to “Open SoloApp”. Click on the “Open SoloApp” button to go back to the app and continue with setup.

App Settings 🎛️
Once signed in, access settings page by clicking on the gear button in the bottom-left corner of the app window:

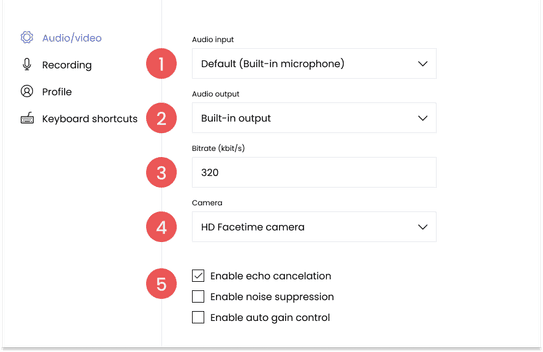
In the “Audio/Video” section of the settings page, choose your microphone (1), speakers (2), leave Bitrate (3) at default settings 320 kb/s, choose your webcam (4), and make sure Enable echo cancelation (5) is checked:

In the “Recording” section of the settings page, you can change the default location where the lesson recordings will be saved by clicking on the file path under “Choose where to save the recording” and choosing a different folder from the pop-up window:

Starting a Lesson 🎧
You can now:
- Enter your teacher’s classroom by clicking “Join lesson” (1) and pasting the classroom code sent to you by your teacher on the following page. In the future, you’ll be able to enter your teacher’s classroom by clicking “Created by others” (4) under “My classrooms” and choosing the correct classroom from the list on the following page
- Create your classroom by clicking “Create classroom” (2)
- Enter your previously created classroom by clicking on the desired classroom icon (3).Note: you can create more than one classroom.

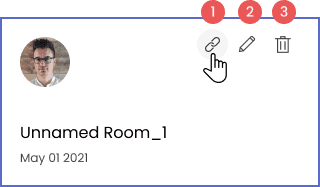
To share the classroom code with your students, hover your mouse over the classroom icon and click on the link icon (1). This will copy the classroom code to the clipboard which you can then paste into an email or other messaging app and send it to your students. To edit your classroom name, click on the pencil icon (2). To delete a classroom, click on the trash bin icon (3):

Please note - the link, edit, and trash bin icons are invisible until you hover your mouse over the classroom icon.
Once you have started or joined a lesson, you’ll see an icon bar on the bottom:

The “Incoming sound quality” indicator (1) shows how stable the audio connection is with your lesson partner.
Switch between “Listen” (2), “Interact” (3), and “Play” (4) modes to achieve the best lesson experience.
Modes Explained 🎻
- 🎧 “Listen” mode allows your partner’s sound to come through at the best possible quality. Your microphone will be muted to avoid using echo cancelation algorithms which leads to loss of sound quality.
- 💬 “Interact” lets you communicate in real time as in other video-conferencing apps; however, in cases of slower connection speeds, priority is still given to sound quality over video.
- ♬ “Play” mode allows your partner to hear your sound at the best possible quality. Their microphone will in turn be muted.
- Use the camera button (5) to turn your camera off and on for privacy or, in case of very poor internet connection, to maximise sound quality.
- Use the microphone button (6) to turn your microphone off and on.
- Use the record button (7) to start or stop recording of the lesson.
- Use exit button (8) to leave the virtual classroom.
- Settings that can be manipulated during an active lesson session can be accessed by clicking on the three dots (9).
Connection quality 🛰️
If the sound quality is not optimal due to inconsistent internet connection, you can try the following:
- Check that your computer is not downloading or uploading something in the background (system updates, downloading a movie, etc.).
- Check that your computer is not busy with other tasks in the background – it is usually best practice to quit all other applications when teaching online.
Happy Soloing!
Your SoloApp Team